
Implementing a Secure and Compliant Cloud Architecture in Microsoft Azure
I’ve been working on a secure cloud deployment project using Microsoft Azure, focused on getting everything properly aligned with security best practices, compliance standards, and zero-trust principles. The environment includess RBAC, encryption for data-at-rest/in-transit, centralized backup policies, and layered defense mechanisms.
This post summarizes my process and how I tackled the problems step by step. Screenshots and illustrations will be added alongside my implementation.
A. Scenario Overview
This implementation takes place in a mid-sized tech firm that develops secure, cloud-based software solutions for corporate banks. Given the sensitive nature of the financial data processed, the company maintains strict compliance with multiple regulatory frameworks, including PCI DSS, FISMA, and NIST SP 800-53. The organization operates through three specialized teams:
- Developer Team: Architects and builds financial applications
- Tester Team: Conducts comprehensive functional testing, maintains QA pipelines, and performs pre-deployment validation
- IT Operations (ITOps) Team: Manages infrastructure, orchestrates deployments, monitors environments, and implements data protection measures
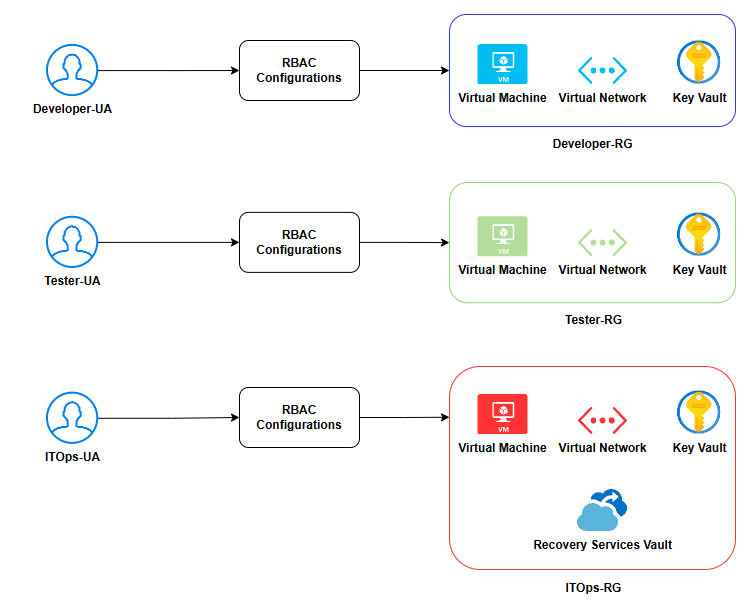
To enforce security boundaries, each team operates within isolated Azure Resource Groups (Developer-RG, Tester-RG, and ITOps-RG), each containing dedicated virtual machines, virtual networks, and Azure Key Vaults. Role-Based Access Control (RBAC) maintains strict access boundaries between teams, while the ITOps team exclusively manages the centralized Recovery Vault and backup policies to meet Recovery Point Objective (RPO) and Recovery Time Objective (RTO) requirements. All security implementations, including encryption, access controls, and automated backups closely align with mandated industry compliance standards.
B. Identify The Service Model
Before diving into implementation, you should clearly identify your needs. Understanding the three main cloud service models is essential, as each offers different levels of control, flexibility, and management that can be tailored to your specific requirements:
- Software as a Service (SaaS): You simply use the application. Think Google Workspace or Microsoft 365. It’s fully managed and ready out of the box.
- Infrastructure as a Service (IaaS): You manage everything from the operating system up. The provider handles physical infrastructure. Best for full control, custom setups, and legacy apps.
- Platform as a Service (PaaS): You focus on code and data while everything else (OS, runtime, infrastructure) is managed by the provider. Great for developers who want to deploy apps without worrying about the underlying environment.
For this setup, I chose Infrastructure as a Service (IaaS). The reasons:
- Full control over virtual machines, OS, and network config.
- Better flexibility to support self-developed applications and legacy systems.
- Needed full access to configure backups, patching, and encryption myself.
- Aligns better with compliance standards like FISMA, PCI DSS, and NIST SP 800-53.
C. Shared Responsibility Breakdown
As outlined in the Shared responsibility in the cloud article, with IaaS, Microsoft handles physical security and hypervisor infrastructure, while I retain responsibility for the guest OS, data protection, access controls, patching, encryption, and backup strategies. Here’s how I structured that:
- Applied OS hardening, patched regularly.
- Enforced least privilege through scoped roles.
- Monitored and configured backups properly.
- Segmented access to avoid accidental data exposure across security principals.
D. Role-Based Access Control (RBAC)
Role-Based Access Control (RBAC) is a strategic approach to managing resource access that assigns users specific roles with clearly defined permissions. Rather than granting universal access, RBAC enforces the principle of least privilege, ensuring users receive just enough access for their responsibilities.
RBAC is especially useful in multi-department or team-based environments where different users need access to specific resources like virtual machines, networks, and secrets, without interfering with each other.
1. Resource Group Setup:
In my environment, I created three resource groups (Developer-RG, Tester-RG, and ITOps-RG), each scoped to a different team. Each of these resource groups contains one virtual machine, one virtual network, and one Key Vault and should be isolated from one another, and access should be tightly scoped based on team roles.
Oppsy, I almost forgot, there is one more resource that should only be with the IT Operations Team resource group - a Recovery Vault.
I also created three new users corresponding to each team named Developer-UA, Tester-UA, and ITOps-UA respectively.
2. RBAC Configurations:
2.1. Assign Contributor role
Unfortunately, Azure doesn’t allow Contributor role assignment via the Azure portal. However, you can achieve this using Azure CLI with the New-AzRoleAssignment cmdlet.
Command Syntax
New-AzRoleAssignment -SignInName <username@yourdomain.com> -RoleDefinitionName "Contributor" -Scope /subscriptions/<subscription-id>/resourceGroups/<resource-group-name> -Description "Providing access for <purpose>"Verify if the role was assigned successfully
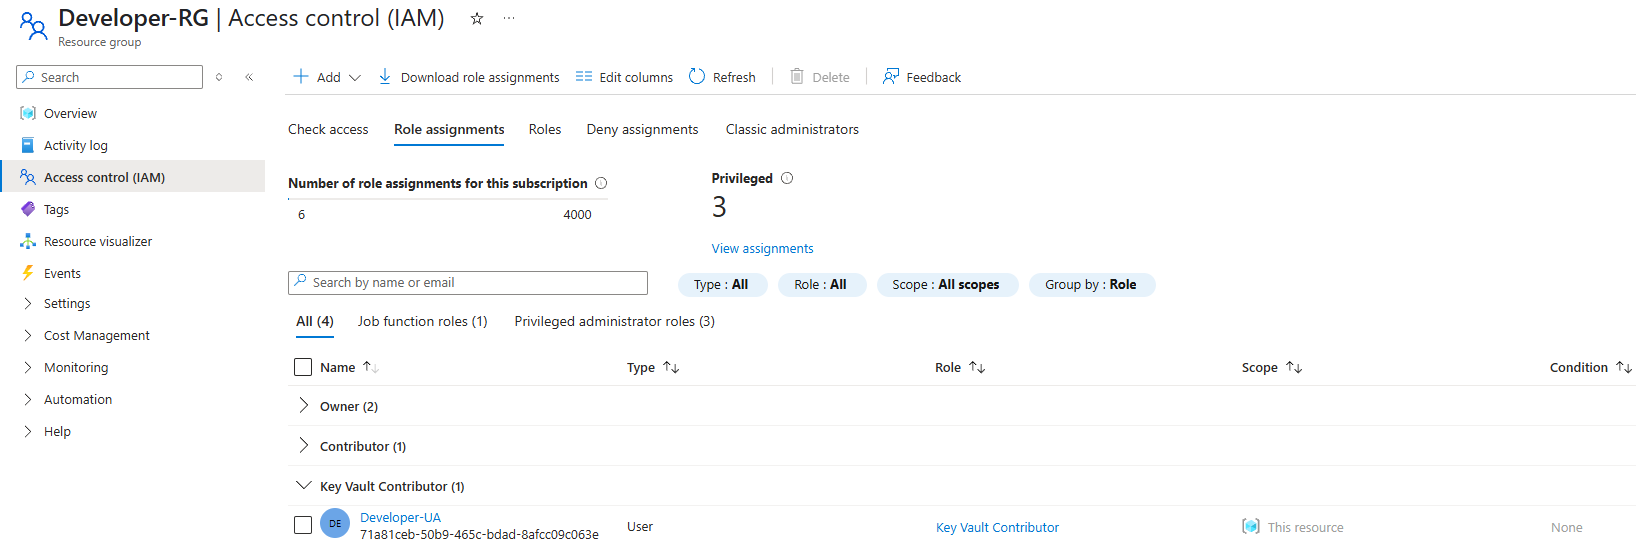
Get-AzRoleAssignment -SignInName <username@yourdomain.com>2.2 Assign Key Vault Contributor role
In case you didn’t know, we can assign role on multiple levels in Microsoft Azure: subscription, resource group, and individual resource.
Previously, we assigned the Contributor role on the resource group level, allowing each user to manage all resources within their respective group.
However, Key Vault access should be scoped more narrowly. Instead of full access to the resource group, users should only manage their own department’s Key Vault.
That’s where the Key Vault Contributor role comes in, it grants permission to manage secrets, keys, and certificates without exposing unrelated resources.
Since this built-in role can be assigned directly via the Azure portal, you can follow Microsoft’s guide here to complete this step.
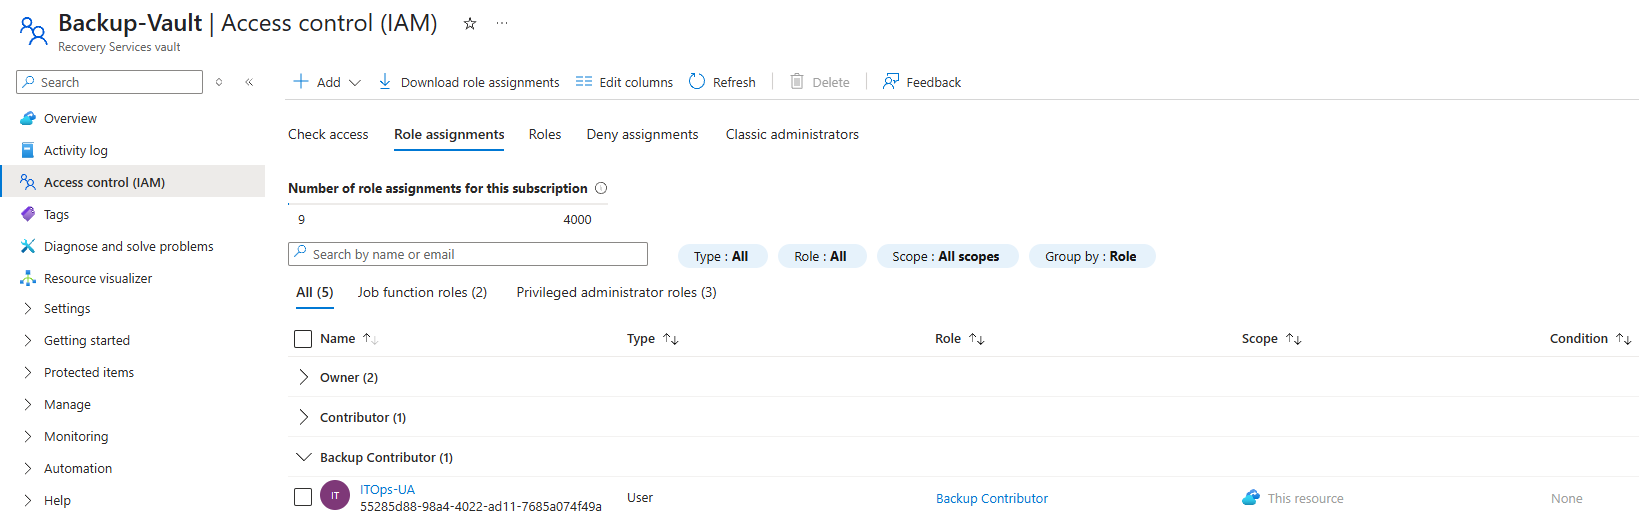
2.3. Assign Backup Contributor role (scoped to IT Operations Team)
Up until now, each user should have two role assignments. Here’s the twist, as specified in the Scenario Overview above, we’ll have to grant our IT Operations Team an extra privilege to perform backups.
To do this, we first need a Recovery Vault created inside the ITOps-RG.
Once the vault is in place, we’ll assign the Backup Contributor role directly to the Recovery Vault. This ensures that only the ITOps-UA can configure backup policies,
initiate restores, and manage backup items without gaining unnecessary access to other unrelated resources.
You can assign this role via the Recovery Vault’s portal just like we did with the Key Vault Contributor role.
E. Defense-in-depth Strategy for Azure Key Vault
Defense-in-depth is a layered security approach designed to protect systems by implementing multiple controls across different levels, so even if one layer fails, others still provide protection. In the context of Azure Key Vault, this means going beyond the RBAC configurations to reduce the attack surface and limit access as tightly as possible.
To address this, Microsoft has an article about Best practices for using Azure Key Vault. For the sake of this project, I chose two best practices introduced and focused on them to enhance the confidentiality, integrity, and network-level protection of sensitive secrets.
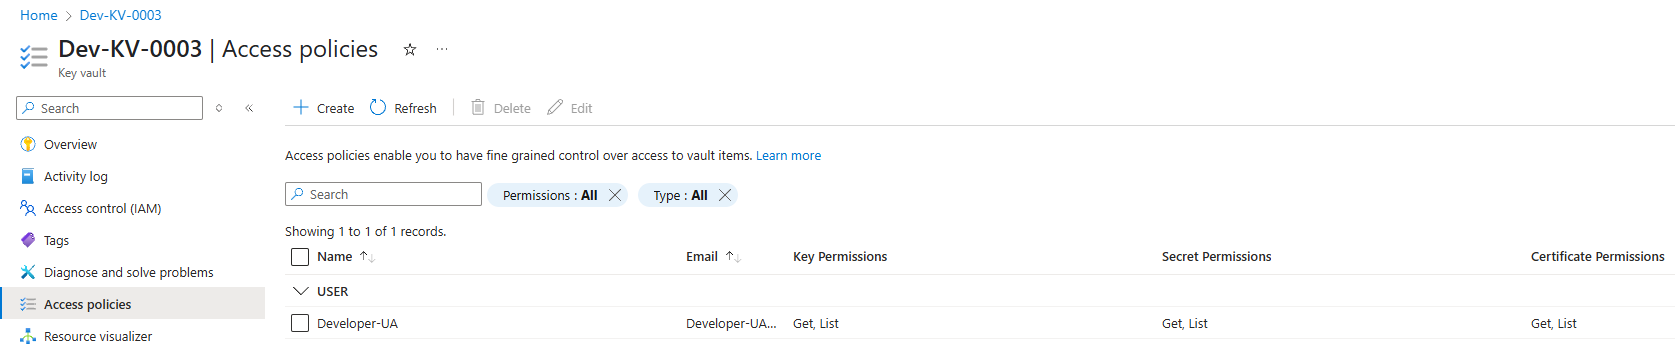
1. Key Vault Access Policy
Key Vault access policies control how security principals interact with the secrets, keys, and certificates stored in your vault and are separate from Azure RBAC configured above and provide fine-grained permission management specifically for Key Vault resources.
In this project, I set up the policy to only allowed Get and List permissions to the assigned user per vault, guaranteeing that users can read and reference values without the ability to alter or delete them, limiting potential misuse or accidental overwrites.
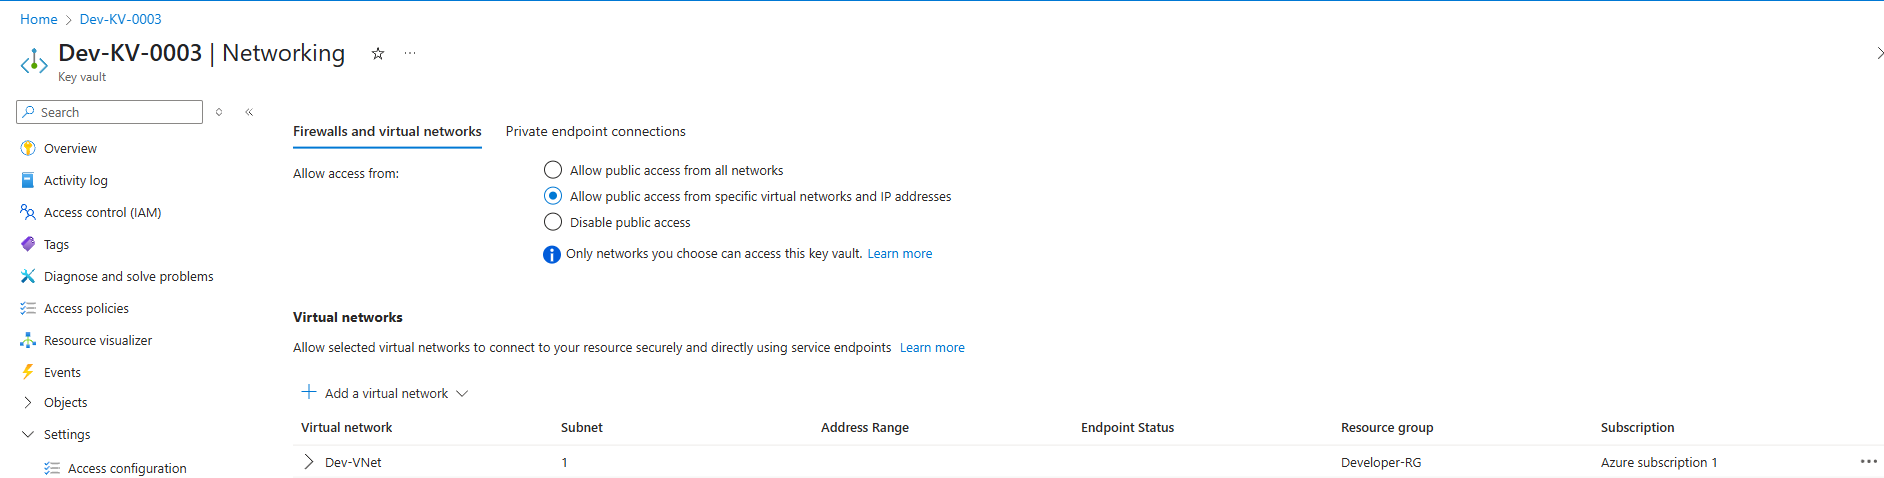
2. Network Access Restrictions
Allowing connections from all over the internet poses extreme risks to the Key Vault in particular and the company in general. Instead, configure each vault to only accept traffic from the virtual network or specific subnets in the respective team’s resource group. This stacks another protection on the defensive arsenal by blocking unauthorized IPs or services from even attempting to reach the Key Vault endpoint.
F. Backup Configuration
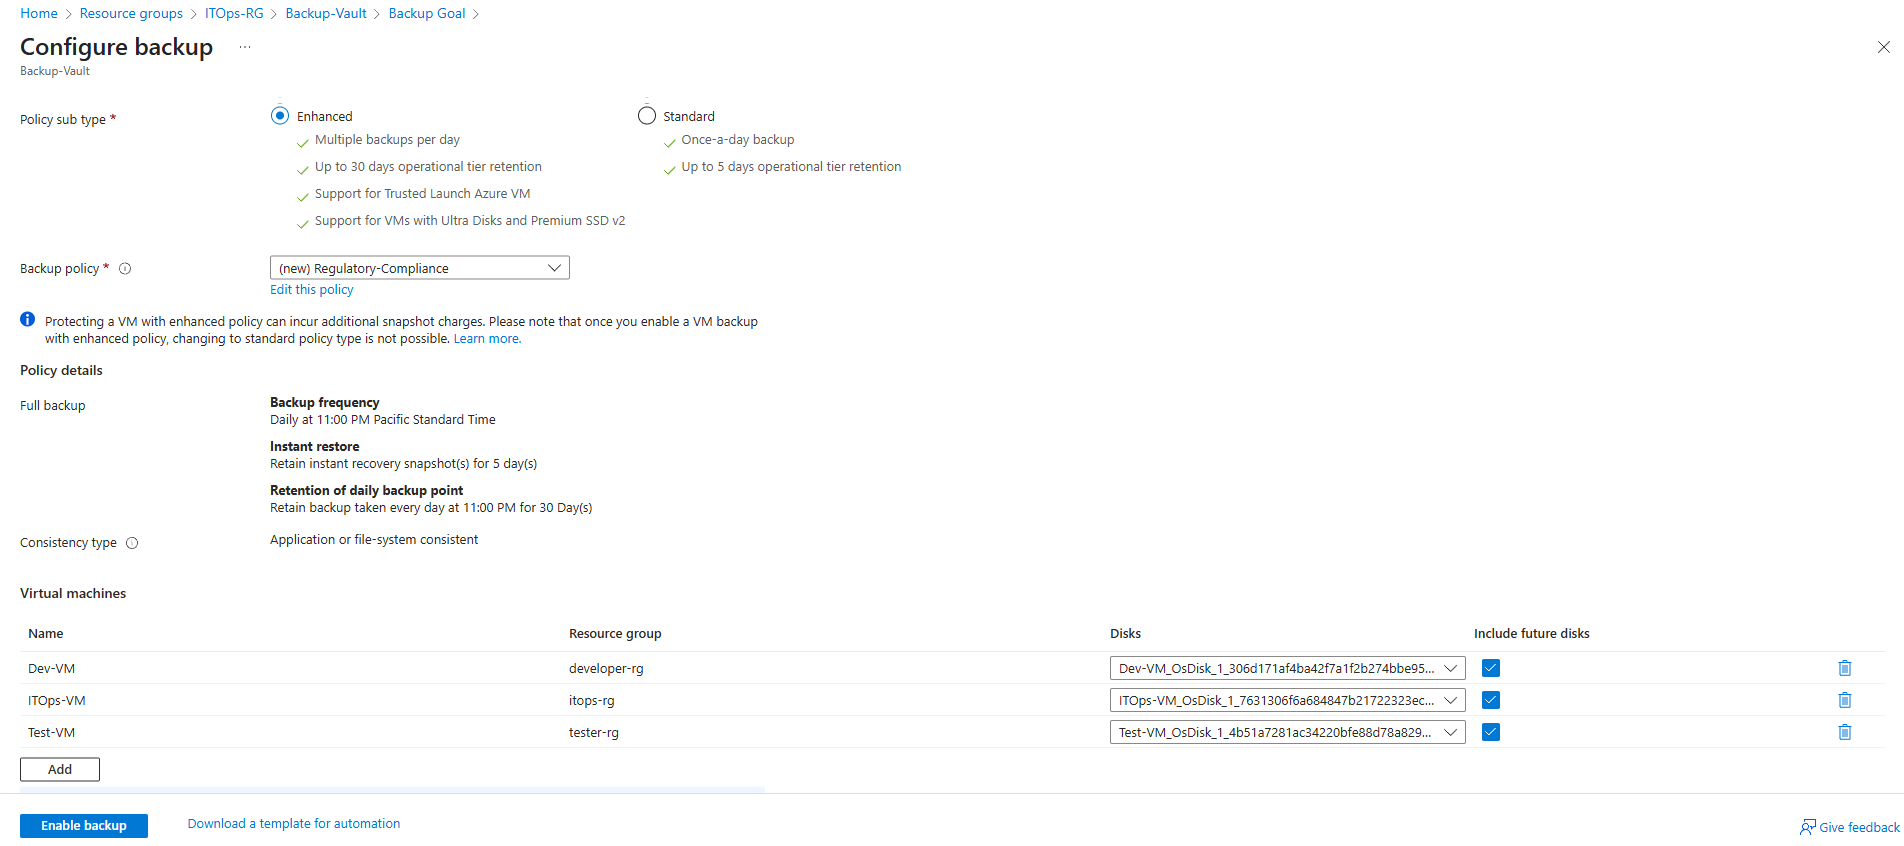
Supposedly, the company’s CISO wants to achieve a Recovery Point Objective (RPO) of 12 hours and a Recovery Time Objective (RTO) of 24 hours. I created a custom backup policy and applied it to all production VMs across teams to ensure recoverability and meet compliance requirements. Here’s the config:
- Daily backups at 11:00 PM PT.
- Instant recovery snapshots retained for 5 days.
- Daily restore points retained for 30 days.
- Stored everything inside a single Recovery Vault controlled by IT only.
G. Potential Threats
We all implicitly understand that there is no such thing as ultimate defense or impenetrable security. Every system has its own weaknesses, which is why the best we can do is try to minimize risks through proactive identification and mitigation of potential threats.
Although we implemented multiple security best practices to improve the resiliency of our security posture, there are still threats that we should keep an eye out for. Ongoing monitoring and continuous improvement of our defenses are essential to address these evolving risks effectively
1. Cloud Malware Injection
This is a critical threat where an attacker inserts malicious service modules or scripts into legitimate cloud applications or storage.
Example: the company deploys a web application that allows users to upload documents but fails to apply input validation. An attacker uploaded a script disguised as a PDF. Upon execution, this gained the attacker access to virtual machines, which they could use as a pivot point to move laterally within the system or perform data exfiltration.
This threat could be handled by secure dev practices and enabling Defender for Cloud. Input validation could be enforced in any public-facing apps.
2. DDoS Attacks
This kind of attack is usually launched using large botnets, attempting to flood cloud services with overwhelming traffic, compromising the availability of a system, and causing disruption for legitimate users. These attacks are low-cost for adversaries yet powerful because they can cause high-impact outages.
Solutions: Enable Azure DDoS Protection (L3/L4) and Azure WAF (L7). We can also configure rate limiting and IP filtering.
3. Admin Misconfigurations
Humans are the weakest link in cybersecurity. A well-intentioned but untrained administrator might accidentally expose a critical Azure Blob Storage to the public internet by setting it to public instead of private.
That’s why we need to have a Change and Configuration Management for all Azure resource modifications. Furthermore, we can enroll in Microsoft’s training to enhance our knowledge and vigilance of cloud security.
Final Thoughts
This project was a deep dive into secure cloud architecture with Azure. I learned a ton about how easy it is to misconfigure things, and how important it is to:
- Apply zero trust everywhere.
- Keep RBAC and backups tight.
- Use encryption with CMKs, not just defaults.
- Monitor and test frequently.
If you’re building something similar or just starting with Azure IaaS, feel free to follow along.