
Catching Shadows in the Cloud: Building a Honeypot Lab on Azure
Ever wondered what attackers really do once they get into a system? Honeypots are a powerful way to find out - not by guessing, but by watching. In this project, I’ve built a fully deployable honeypot lab on Microsoft Azure, designed to lure in threat actors and analyze their behavior in a controlled, isolated environment.
This lab simulates a vulnerable server environment with logging, alerting, and defensive layers built in. Whether you’re a blue teamer looking to sharpen your detection skills or just curious about how attackers operate in the wild, this guide will walk you through creating your own cloud-based honeypot from scratch.
🧱 Architecture Diagram
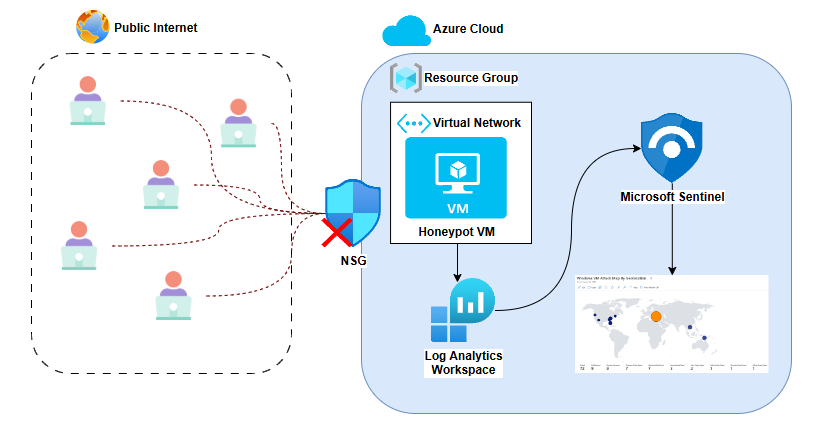
⚙️ Cloud Infrastructure
| Component | Purpose |
|---|---|
| Azure VM | Runs Windows Server and acts as the honeypot |
| Network Security Group | Add a custom inbound rule to intentionally expose the honeypot to the public internet |
| Public IP | Connects attackers to VM |
| Log Analytics Workspace | Ingests Windows Event Logs |
| Microsoft Sentinel | SIEM layer for alerting & dashboards |
| GeoIP Watchlist | CSV-based mapping of IPs to countries |
| KQL Queries | Powers data analysis and alert triggers |
📌 Implementation Guide
Step 1: Set Up Azure Environment
- Create an Azure Resource Group
- Create a Virtual Network
- Create & deploy a Virtual Machine inside the resource group (this will be your honeypot)
- Attach the VM to the Virtual Network (VNet) created earlier
- Check the
Delete public IP and NIC when VM is deletedoption - Diasble Boot diagnostics
- Configure the Network Security Group (NSG) by creating a new Inbound Security Rule allowing any connection from any IP address to any port
- Turn off the VM firewall
💡 Note: With a $200 free credit you have from the Azure subscription, you would like to go with a decent but not too beefy VM for the sake of performance (I suggest the Standard D2s_v3 and the Premium SSD option)
Step 2: Create Log Repository
- Create a Log Analytics Workspace
- Create a Microsoft Sentinel instance
- Add the previously created LAW to link it with the Microsoft Sentinel instance
Step 3: Connect VM to LAW
- In the Sentinel instance’s portal, navigate to Content Hub
- Search for *Windows Security Events"" and install it
- Configure data connectors (Windows Security Events) using
Windows Security Events via AMA- Create a data collection rule to collect all security events from the virtual machine
Step 4: Upload GeoIP Watchlist
- Prepare a
geoip-summarized.csvfile with IP ranges and locations - Go to Sentinel → Configuration → Watchlists
- Upload the file and assign it the alias:
geoip
Step 5: Write and Run KQL Queries
- Within the Log Analytics Workspace, choose the workspace that you created to start monitoring logs
- Query failed login attempts using:
SecurityEvent
| where EventID == 4625
| project TimeGenerated, Account, Computer, EventID, Activity, IpAddress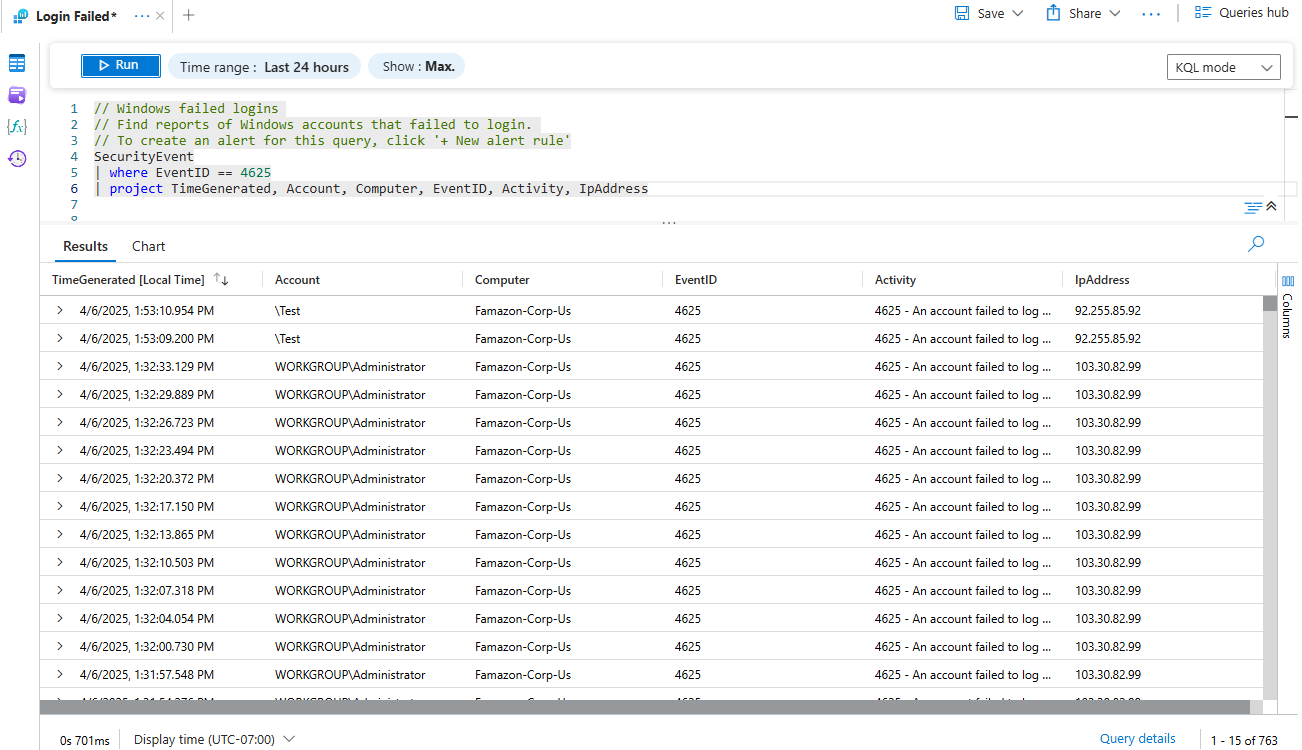
- To observe geographic information to see where the attacks are coming from, run:
let GeoIPDB_FULL = _GetWatchlist("geoip");
let WindowsEvents = SecurityEvent
    | where EventID == 4625
    | order by TimeGenerated desc
    | evaluate ipv4_lookup(GeoIPDB_FULL, IpAddress, network);
WindowsEvents
| project TimeGenerated, Computer, AttackerIP = IpAddress, countryname, latitude, longitude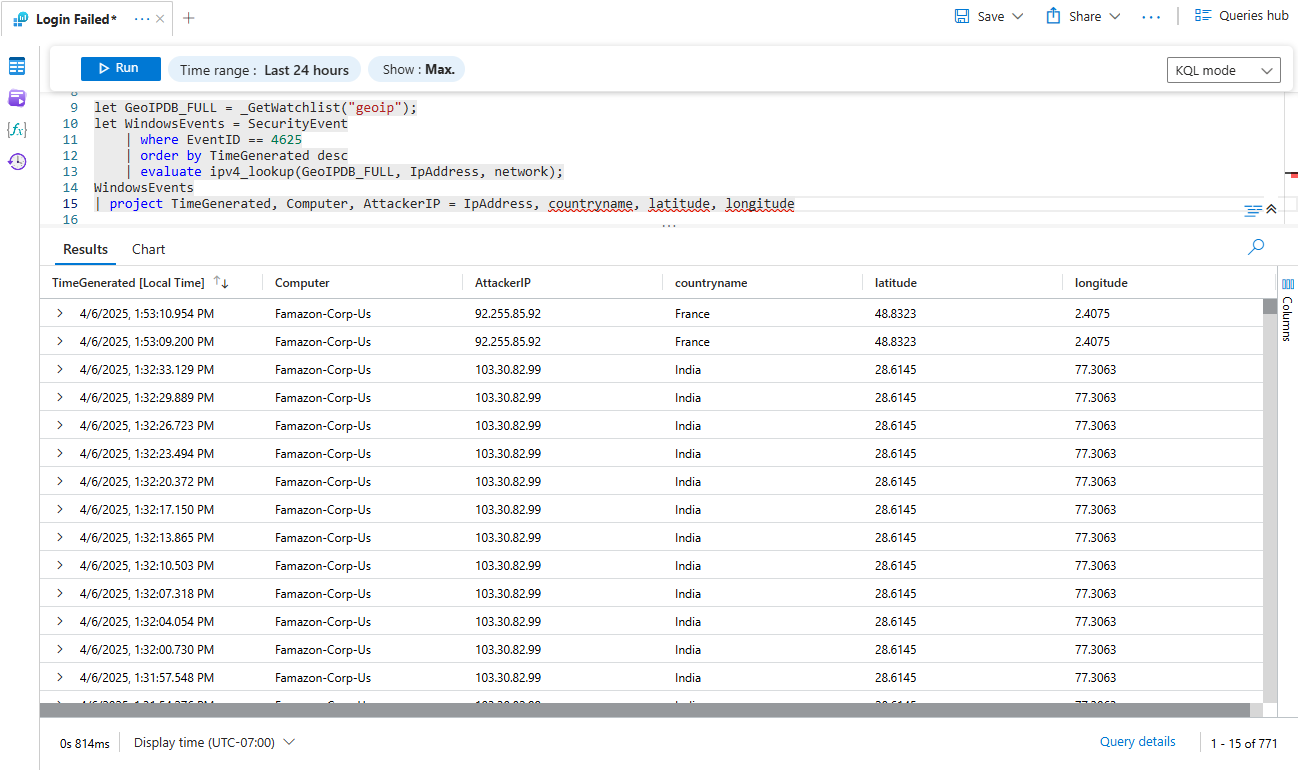
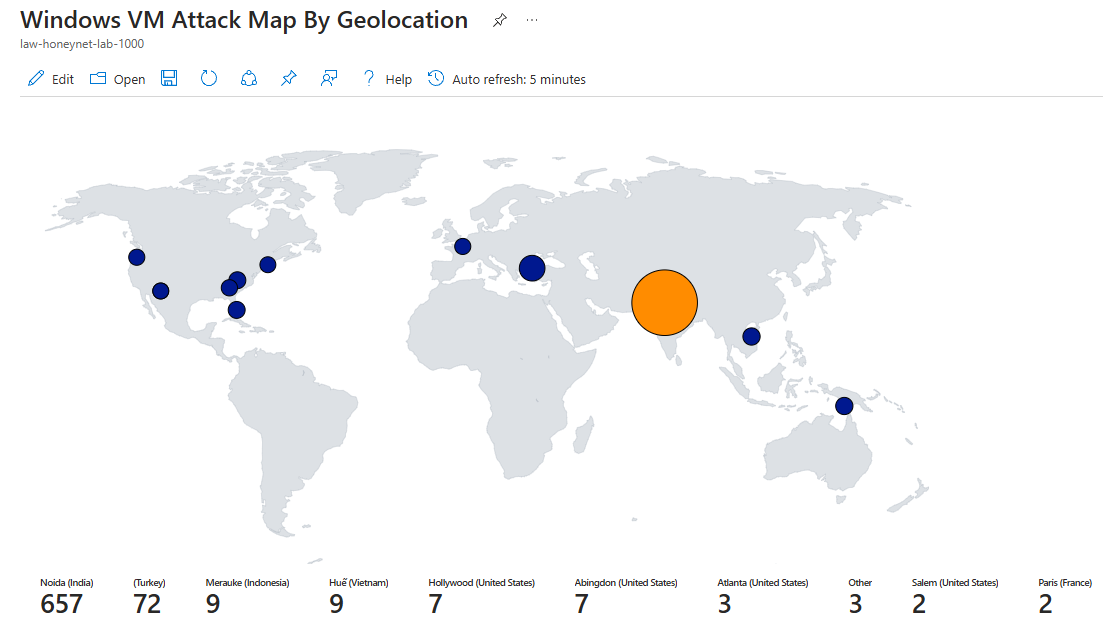
Step 6: Build Attack Map and Dashboards
- Go to Sentinel → Threat management → Workbooks to add a new workbook
- Remove the workbooks that are automatically generated by Azure
- Click Addl → Add Query → Advanced Editor then paste the JSON below inside the box then hit Done Editing. You should see the attack map
{
  "type": 3,
  "content": {
    "version": "KqlItem/1.0",
    "query": "let GeoIPDB_FULL = _GetWatchlist(\"geoip\");\nlet WindowsEvents = SecurityEvent;\nWindowsEvents | where EventID == 4625\n| order by TimeGenerated desc\n| evaluate ipv4_lookup(GeoIPDB_FULL, IpAddress, network)\n| summarize FailureCount = count() by IpAddress, latitude, longitude, cityname, countryname\n| project FailureCount, AttackerIp = IpAddress, latitude, longitude, city = cityname, country = countryname,\nfriendly_location = strcat(cityname, \" (\", countryname, \")\");",
    "size": 3,
    "timeContext": {
      "durationMs": 2592000000
    },
    "queryType": 0,
    "resourceType": "microsoft.operationalinsights/workspaces",
    "visualization": "map",
    "mapSettings": {
      "locInfo": "LatLong",
      "locInfoColumn": "countryname",
      "latitude": "latitude",
      "longitude": "longitude",
      "sizeSettings": "FailureCount",
      "sizeAggregation": "Sum",
      "opacity": 0.8,
      "labelSettings": "friendly_location",
      "legendMetric": "FailureCount",
      "legendAggregation": "Sum",
      "itemColorSettings": {
        "nodeColorField": "FailureCount",
        "colorAggregation": "Sum",
        "type": "heatmap",
        "heatmapPalette": "greenRed"
      }
    }
  },
  "name": "query - 0"
}
Step 7: (Optional) Add Alerts and Automation
- Create alerts for multiple failed logins from same IP
- Use Logic Apps for auto responses (e.g., email or Slack alert)